
Product
INSTALLATION
-
The flooring should be installed at a ground temperature of 10℃ ~ 28℃; The flooring is recommended to be installed indoors.
-
Preferable surfaces/grounds for flooring installation: Plywood ground, flat wood base ground, tile ground, or self-leveling cement ground. If the flooring is installed on an uneven base, the height tolerance should be within 3mm, otherwise, an appropriate self-leveling process should be applied.
-
Before installation, the site should be cleaned to ensure the ground is dry, clean, smooth, and free from debris. No protrusions should be on the ground. Any cracks found on the ground need to be leveled with damages repaired.
-
Regarding the features of SPC flooring, around 3mm joint should be kept between the completed floor laying and the wall surface, and close the joint with silicone.
-
It is recommended to mix flooring from different cartons for installation.
-
Avoid direct sunlight after the flooring is installed.
|
|
|
|
|
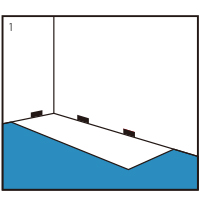
Flooring shall be laid from left to right. Place the first piece of flooring at the upper left corner of the room, exposing the head and side seam grooves (the concave part). Place silicone to close the joint with the wall surface upon completion of floor laying. |
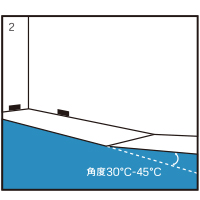
To install the second piece of the first row, align the tongue (the protruding part) of the shorter side with the shorter side of the first flooring piece, then use a rubber hammer to tap the tongue into the groove (the concave part). (The tongue must be clean and tap to the middle of the two flooring pieces.) |
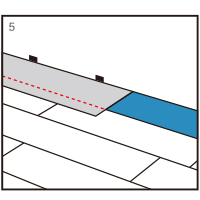
When installing the last piece of floor in each row, place the reverse side of a full-length piece of the floor beside it, mark the required length, use a ruler and cutter to cut along the indentation, and bend it with your knee against it, then install it as shown in Step 2. |
|
|
|
|
|
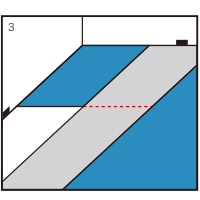
To install the second row, cut a piece of the flooring at least 15.24cm shorter than the first one in the first row. First, insert the tongue of the longer side into the tongue groove on the long side of the first row. For the second piece in the second row, tap the tongue of the short side into the groove on the short side of the first piece installed at the second row. |
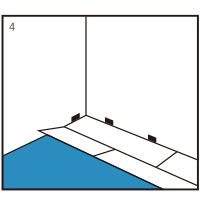
When laying the last row of flooring, measure it on the reverse side with the tongue facing the wall, then cut the required width and length of the flooring. Place silicone to close the joint with the wall surface upon completion of floor laying. |
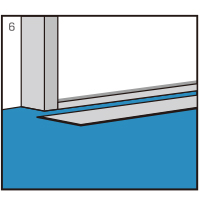
Reserve spacing to the wall per close trimming form and style of the door frame, without obstructing the opening and closing of the door. At the bottom of the aluminum door frame, place the reverse side of the flooring next to the door frame to measure the exact height for cutting so that the floor can be easily mounted under the door frame. |
![]()
We've got FACEBOOK!